Sunday 5 February 2017

More Backyard

This summer we have really tried to get the backyard finished off. Hubby built an outdoor bar - somewhere to drink his beer and catch the summer breeze :) we brought a few pots and a blackboy. We would love to get an outdoor lounge - but the birds come in to check out the dog food bowl and make a mess so we don't want to risk it just yet.

Bar made out of decking boards and he welded up the frame. Barstools purchased from Super Amart - hopefully they last outside

New Black Boy
The new bar

We re potted this little guy and killed it :( be very careful if you ever have to move these plants RIP
Other half of backyard

November 2014 - Hedge just planted! See below for height now


Friday 18 November 2016

Landscaping Progress - Out the Back

When we first moved in and keen to just get rid of the dirt surrounding the house we put bark around the plant along the side of the house next to the alfresco. What a mistake that was!

It only looked good for the first week! After that we were battling the dog digging in it, every time it rained and the dog would walk through it and then bring the mud/dirt under the alfresco. When it was dried up it would create dust. It fades really quick and the dirt, rocks from the build, leaf matter all got mixed in amoungst it. It looked horrible!

We put up with it for 2 years before hubby finally got over it and changed it over for he river pebbles 40mm - What an amazing difference it makes! He shifted 2.5tonnes of rock to fill this space. and we love it! And will never have to re-do it. Best part of all the dog cant move the larger 40mm rock. so no more digging!

5Th October 2014 

1st April 2015 
10th November 2016

The palms love this spot. We realise they will eventually be too big for the space in years to come. We keep trimming them to thin them out. They look so good with the pebbles around them.


View of palms from the living room, they are a perfect screen to the fence only 1m away! Another year i don't think we will see much of the fence at all.

Tuesday 18 October 2016

Im on Instagram

Ive started an Instagram page, from the lack of posts on here you you can prob tell i don't have time to keep updating this blog, so Ive turned to Insta! Afterall a picture tells 1000 words!

Insta is to share my pics as i start to furnish my home hopefully one day i can say "im finally finished" - i thought buying a new house would mean less work once we moved in. 2.5 years later were still going. We will get there one day :) For now were happy and settled and love our home.


Light me up!

Two years after moving in we finally got our lights sorted and got rid of the batons. I claim a "minimalist low fuss look" with the baton install - but hubby didn't buy it, it was time to get the downlights and pendants. Trying to research what was the best downlight was hard - too hard so i didn't bother trying to confuse myself with Lumens and colour of the light or what was best and what to steer clear of. There is far too much information out there that its just a little too overwhelming for me.

Speaking to some electricians some will tell you the trend is daylight and some will tell you the trend is cool white - it's "just what you prefer" they would say..............

So that's what i did - work out what type of colour i liked. Speaking to Harvey Norman lighting in Penrith they were so helpful. They let me borrow a daylight and a cool light option to take home and hold up in our house.  I knew i hated the yellow warm yellow lights so that option was out. And we settled for in between cool and warm "daylight 4000k" The brand we brought has a samsung chip and Harvey Norman said its their best seller. A great quality bulb. We are very happy with them.

Adam from Adspark (0414 858 213) a local Electrician installed them for us. He is a great guy and we were happy with the job that he did. 

The pendants were purchased from Beacon lighting. A bit of a loss for me (cant win all the battles) i didn't get the pendants i wanted. I wanted the white scandi looking ones, but hubby wanted the plain classic glass ones - atleast they wont' date. And its good to just get something hung in the kitchen and foyer. and they definitely wont clash with anything in the house being so neutral.

Another job to cross off the list!

Foyer Pendants


Wednesday 13 May 2015

Concrete Pathway in the Backyard

This post is rather late considering we had this done in November.  Better late than never. 

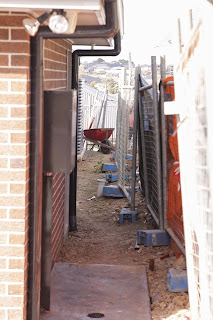
Once we had completed all the landscaping we were left with the path down the side of the house which needed to be covered. The dead side of the house is the only access we have to get hte lawn mower thorugh, and it also stores the bins, and access from laundry to the washing line. So it is used a fair bit.

At first we were going to do rocks and pavers to create a stepping stone effect

Similar to this

But this wasn't practical to drag the bins and mower over so that idea quickly turned into the possibility of paving it. We looked into the type of pavers that were available and had quotes on costs to have it laid. It was far to costly to spend so much on something that no one really sees. And paving concerned me with the ground movement, i didn't want my paving lift in a couple years time and look messy.

We then started to explore concrete options. A stamping pattern to create the look of pavers both appealed to us, and concrete is so easy to maintain. and will stay in place to create a nice even surface.

Here is an example


We then started to get quotes.  Hubby decided to go with a local concretor that seemed confident and was going to offer us a good service, he was keen and had plenty of photos to show us. I wasn't to sure as i couldn't find anything on the web about him. But left this one upto hubby to organise so went with the flow.

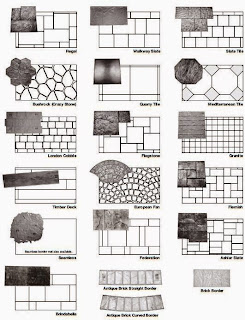
The concrete is a fantastic choice, and its super cheap compared to the paving. The stamp we went with was called FLEMISH, and the colour was a one colour choice called Bluestone.  Many people opt for a 2 tone effect to create shadowing, but we wanted to be able to colour seal it in the future so went with 1 colour.

As you can see from below there is so much choice. PARCHEM in penrith has osme stamps on display outisde that you can view to get ideas.


Here are the before shots of the area we had to concrete.


The concrete has just been poured and stamped. Awaiting the colour seal.

The stamping process


Colour Sealed again with the Bluestone, massive difference between Bluestone colour through concrete and the actual colour sealer.
He also added some grit product to it as it was so slippery. The concretor promised to do it but he didn't so keep in mind if considering the concrete stamping.


Hubby has now painted the retaining wall in the Woodland Grey (Same as the fence) Looks really good!


Before retaining wall is painted


And just because i love before and after shots, and looking back at old photos when we first moved in and admiring what we have today i found some to share with you.

All but a distance memory now!  i know im writing this 1 year after we moved in so 12 months ago we were experiencing the photos below, and today we can go and enjoy valuable family time with the kids as our yard is so easy to maintain and its all finished!


In summary all im going to say is pick you concretor wisely! Make sure you can 100% trust them once that concrete is poured it can not be removed.

Alfresco & Portico Tiling

Something I didn't think we would be able to get done for a while was the Alfresco tiling. It was last on my list of things I wanted to get done as it wasn't urgent. One day I decided to get quotes to see what it would be worth, thinking we couldn't afford it. The quotes came through reasonable so we were able to go ahead quite quickly.

Given that i rarely have any spare time on my hands, and dragging the kids through countless tile shops is not something i wanted to do, i set off on my own to check out the local tile places and picked out my favourite options. Once i had narrowed it down to about 4 possibilities we had the kids looked after for a couple of hours on Saturday morning - this was our chance, we had to select something that day - and hardest part of all hubby and i had to agree - that's the biggest challenge right there :)

First tile shop was CTM in Toongabbie - he hated everything i liked,off to a great start! Next place he selected something i hadn't considered and i didn't mind the texture of it, so we had a possibility. again he didn't like my choices at the second place (Lexatonia Tiles). The 3rd place was Beaumont tiles and the ones we liked were way out of our price range.

In the end we selected the one that he had picked out, I was able to borrow a sample for the night to see if it suited the tones of our house, and it did.

The tiles were purchased from Lexatonia Tiles in Seven Hills on Abott Road. Great service and a great price too. The tiles ended up being $26sqm. Pretty good considering Beaumont tiles were up around the $60sqm price range.


The tiler even said the tiles we picked were so hard to cut, he believes they will be near impossible to crack. We have spares just in case.

The area we had to tile was just under 40sqm to cover the Alfresco and portico. The tile is a 600x300mm porcelain tile called PROVENZA ASH and it is rated for outdoor use.

The tiles so far are easy to maintain ( I mop with a ENJO outdoor mop) the grip on them isn't that extreme rough sand paper feel so grit doesn't stick to them to badly. They are beautiful to walk on too. The colour is a prefect choice for an outdoor space. It doesn't show the dirt and doesn't show the doggy paw prints too badly either, which is a bonus for someone that is a little bit OCD when it comes to cleanliness. 

Would highly recommend this tile.

Our tiler suggested to lay them length ways in a brick pattern, which was the total opposite to what i was thinking, as i thought of lying them horizontal in a straight pattern so the space would appear wider.


Here is the finished alfresco area. Still some grout dust on them when i took these pics, its gone now though after a few washes.


I know i haven't posted about the laundry fit out yet, and that will come shortly, we also did the tiling for the splashback in the laundry. 600x300mm tiles

Here is a sneak peak....more to come in laundry post.


Wednesday 29 April 2015

Happy 1st Birthday to our home

We have official had our home for 1 year now! 

Its gone so fast. I'm totally in love with our home. There is nothing i would want to change. And there have been no major issues.


I still have so much to post on and add to this blog. Just finding it hard to update on a regular basis.

Since my last post we have completed the Concrete out the back | Laundry Fit Out | Tiled the Alfresco | Couch for home theatre.

Next on the list when we can get around to doing it will be the study fit out, home theatre wall hung cabinet and our lighting. We still have just batons through out the home because i cant find anything that i like.

I will get around to updating the blog with everything that we have done. Just have to find some more hours in the day.