Wednesday, 11 December 2013

Windows Installed

Moving right along! almost ready for Brick work now. SS said we should get a few bricks laid next week if the weather holds out. Then construction takes hols as of next Friday. Returning in January to finish the bricks. It will be a long wait! im so eager for them to keep on moving right along.

All that is left before bricks is for the plumbing roughin. Bricks should arrive on Friday!

Colour choice APO grey. Branded Stegbar.

Only issue we can see is that they forgot our toilet window. This was an added room to the house so it must of been overlooked. 

For those reading before deciding to build - Remember to order your obscure glazing on the bathroom windows!

Main Bedroom Windows


Saturday, 7 December 2013

Features that ARE NOT standard on the Drysdale

I thought that i would take some time to let future Drysdale (or EBH) builders know the sort of features that are not standard inclusions on the house. I was lucky to have read a lot of forums and other blogs and found information that helped me ensure certain things that i wanted included were.

1. Wire Shelving in the WIP comes as standard.
I dont know any house that has wire for shelving in a Pantry. EB should just include melamine shelving as standard. Although the upgrade to melamine was $800, and i wasn't going to pay that much money for 4 MDF melamine Shelves. Ill update after handover.

2. The portico does not come slabbed as part of the house.
You will get the same option as your chosen driveway - concrete or pavers.  We paid approx $350 to have the H class slab extended to include the portico so we can tile this later on.

3. The windows in the privacy rooms (IE toilet bathroom) are clear glazing.
You have to opt for he obscure glazing. They dont tell you about this, i only found out about it from reading other forums. Why EB doesn't include obscure as standard i dont know! OR why they dont bother telling you that its clear glass and giving you the option to upgrade i also dont understand!

4.) The design doesn't include an internal garage door.
To add one cost us $299 for the Deco1 Door that will match the rest of the doors in the house.

5.) Rainwater Tank as standard is round. Check council guidelines in your area, our council requires them to be a certain distance from boundary, which meant we could never fit a round water tank, and had to pay $1328 for the slimline version.

6.) We chose the harvard facade, And opted to get the brickwork included instead of the cladding. This change didn't cost anything

7.) Closed off the opening from study to living room. This didn't cost anything.

8.) The standard bench width in the kitchen is 800mm, the Kellyville display home shows a 900mm width island bench. I got a bit of a shock when KC told me it was 800mm, I had to pay to increase it to the 900mm and then in the end increased it again to 1000mm width.

9.) There is a normal hinged door included on the WIP, i changed it to a Cavity Slider (CSD) which wont be as restrictive when entering the pantry.

10.) There is no door as standard on the ensuite. We paid $280 for a CSD Deco 1 Door

11.) Note the fridge cavity. We had to adjust ours to suit the larger style fridge and end up with a 1000mm cavity. For RHS opening fridge doors you need to be aware of possibility the door will hit WIP wall.

12.) Overhead cupboards are not included in the standard design! 

13.) Di Lorenzo will charge you an underlay fee for any tile that is over 20x20cm for wet areas and 30x30cm for the main area, Even when they call it the standard range tile and you choose a 45x45cm, the term "standard" relates tot he tile, not the size. We got caught here when we received the quote and they had charged us for underlay on the wet area tiles.

14.) Antenna is not included in the standard inclusions. You add this on at electrical appointment if you want it.

15.) You get one double powerpoint in each room as standard. Electrical soon adds up quickly when you want a couple of points in each room.

Im sure there is more, and if i think of more along the way i will make another post. But for anyone building the Drysdale there are so many options and features that you dont get told about unless you ask for it.

Another example of the Eden 4 door we have, we were only told of the translucent and the standard clear. I found out later that there are about 8 options of different glazing you can have in your doors. I have no idea why they didn't tell us about it.


Thursday, 5 December 2013

Frames Installed

What an awesome surprise we were given today! Hubby headed up the block in his lunch break to see if anything was going on, and to his amazement saw the frames nearly completed. We were thinking frames were getting delivered tomorrow, and to be installed perhaps on Monday!

The guys today must of worked their butts off! Neighbour reported they started at 7am, Crane for roof was there just after lunch and now its complete!


South Side of the house

Backyard 6m depth

Wednesday, 27 November 2013

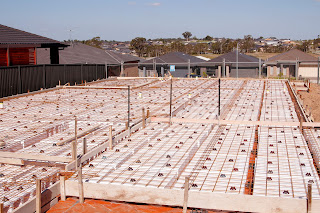
We have been SLABBED!

6 months & 5 days from the deposit to slab! So exciting  and now that we see it, its been worth the wait. Friends comment "its only cement" but until you build i guess you dont understand the full extent of how exciting a huge piece of concrete is. From this we can see how our house will sit on the block, the size of yard (not much lol) the retaining walls (eeekkk) lots of work to be done, but we will get there.

I was hoping id be able to see the slab get poured, and was going to sneek up at 6:30am this mroning to see if trucks were starting to line up, but didn't think it would be happening yet!

Then a spy tells me by 9am is finished, then SS rings to say its all done! Wow so quick! 

I think it will take a week to cure before the frames will arrive. Im meeting with SS tomorrow to discuss the timeline of the build and answer any queries i have! cant wait. SS is sounding like a true champion so far. And lately with some of the "stories" ive heard im hoping my SS stays a true champion and looks after us.

1 week exactly from site scape to slab! with some massive down pours in between id say thats awesome timing! So stoked there were no delays and they moved forward so quickly!

Big bits of foamy stuff  called pods that sit under slab - lol
Pods Ready and waiting to be covered with cement


Our very own special piece of cement we will soon call our home


Saturday, 23 November 2013

Peiring Placement 7 Pods have arrived

The water from the weekend rain has drained away and we can now see where all the piers have been placed


Pods arrived on Saturday morning. Would be great if they put them into place tomorrow. The end of the week its going to be well over the 30's so pretty hot for pouring a slab. Lets see what the week brings.

Friday, 22 November 2013

Piering, Plumbing & Formwork completed

We have had so much rain over the past couple of days, and constant thunder rolling around the suburbs.  I took a drive out to the block this evening and the place looks like a swimming pool. I had to slip and slide through the mud to get the photos of the back of the block. 

Was surprised to see all the peiring, plumbing and formwork were also done, i had only expected the fences to be there with all the rain we have had at our place.

The other day the block was so dry and neat and now its a mud pit! i hope the rain holds off over the weekend, looking forward to seeing the pods arrive next


Plumbing Placement

Left Hand Side Boundary. Drops off to the rear approx 600mm.
No drop edge beam, soil comes out 900mm from slab line approx

Backyard with Main Bathroom in View
  
Kitchen & Laundry
Main Bathroom

Back Yard - Will be fun removing that soil


Backyard - Will end up approx 6m from rear of the house

Wednesday, 20 November 2013

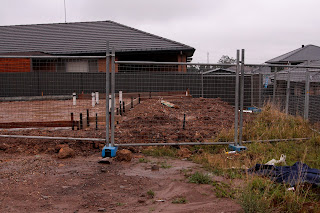
Cut & Fill - Check!

There is movement at the block. Thankfully the rain held off and they were able to complete the cut & Fill as planned. Now we can get a better idea of the retaining wall sizes and also the slope of the block down to the backyard! we have a lot of dirt to move to make the backyard more user-friendly.

Tomorrow we should get our lovely "Keep out fence" and hopefully they start setting up to pour the slab by the end of next week,

Rain Rain stay away don't come back another day!


Friday, 15 November 2013

Our Big Door 2340 x 1200mm Dream was not meant to be

I thought i would tell you all about our Front door dramas to alert others if they are in a similar situation to us.  From Day 1 we wanted to have the "display options" 2340x1200mm Eden 4 Door as viewed at the kellyville display home. We were told to have this size we needed to go 9ft ceilings. So we also increased the height of the ceiling in the entry way to accomadate this. We couldn't afford to have 9ft ceilings throughout.

This door at this size got through the whole process - Tender, Contract, DA Check, Final Plans Check. And on the eve of signing when i was checking off the plans it suddenly dawned on me that we had chosen a larger bed 1 door that went with the display options pricing package, But how can a 2340 door open up into a room that could only accomadate the standard 2040 door. When i questioned this to EBH they said that i was right, that we couldn't have this large door, but we also couldn't have our entry door either.

In order to get the larger entry door that we wanted the frames for our whole house needed be to 9ft. Not just the ceilings, So increasing the ceilings still leaves the standard 8ft frames, and therefore the 2340 door will not fit. So only hours before we were due to sign off we were hit with this information. Not only had we paid the extra $950 now for 9ft ceilings for no reason, but we couldn't have the larger door that we wanted.

We now have a 2040x1200 door in a 9ft ceiling space. Hopefully it looks ok and doesn't seem out of place. Ill have to hang a nice pendant light in the entry to try and fill the space now. And i guess the higher ceilings as you enter the house still might look ok - cross fingers! trying to find positives to this stuff up! 

We were eager to push forward, and even though EB said we could remove the ceilings if we wanted to without the admin fee, it would mean further delays and more PCV's to sign off and to us it wasn't worth it. EB had promised to get us into construction as quickly as possible as a result and in the end this happened within 8 working days instead of the 20 Working days they allow.

Released Into Construction

Very happy day yesterday! EBH have stuck to their promise of getting us through to construction earlier than the average due to the delays and muck abouts with signing off our final plans. We should find out our SS on Monday and also receive some sort of plan to the week ahead and when things will start moving on the block!

So glad to have admin behind us! Cant second guess my choices now. Just have to hope that the past 6 months of researching has meant something and that everything pulls together nicely.

Happy Days!

Sunday, 3 November 2013

Final Plans and Documents are checked

I have now finished checking over the final plans. Nothing to  major to change, just a few things missing on one document that was on another document and thankfully nothing wrong with the pans so there will be no delays or extra costs involved there. We were supposed to have this all done a week a go but KC had the kitchen plans wrong so we spent 2 days wasting time there while they got the plans updated and sent off to KC. If i only i could charge them a $150 admin fee for wasting my time! grrrr - still so annoyed they charged us that fee.

So this is it the point of no return. The final plans will be what the construction team use. So i hope they are right. Too late now if i have missed anything. But i can honestly say i have checked the plans now about 6 times and if they weren't right for the CDC approval then we would of ran into some issues and extra costs and more time wasting to be had.

So here i am still stuck in this admin hole! thought id be out of it by now, but something always pops up and delays things for a few days! But i can feel the count down is on! the day i see "released into construction  of the EBH portal will be a VERY VERY happy day!

Red Pegs are in!

We had a nice little surprise on Friday afternoon while visiting the block and taking some photos i noticed a little red peg sticking up out of the grass. Was so exciting to see progress. It made my day! so far its all been paperwork and more paperwork, knowing something will be happening on the block in a matter of weeks is super excititng!


Thursday, 10 October 2013

DA Check begins

Feels so good to be a this stage! No more PCV's to sign and no more internal selections to make! Final plans will apparently take upto 3 weeks to come through. Will be nice to have 3 weeks off while we wait and not really have to think about house stuff. Everything else is pretty much done. All we need to do is check off the plans and then we can say good bye to admin for ever!

Friday, 4 October 2013

Electrical Selections - HSI

This appointment was pretty straight forward. Id spent a few hours with dad at the display home going through each of the rooms deciding on what power-points we needed. I knew straight up down lights would be way over budget so we didn't consider these. Dad is a retired electrician so can do a lot of the power points for us which is good.

The costs soon add up approx $75 per extra baton and $80 for each double power point before we knew it we were looking at a $3000 quote. So we cut back on some 2 way and 3 way switches, and removed the provisions they charged us for a wall hung TV in 3 rooms which was $165 each.

We also removed the provisions for future ceiling fans too which was $75 for a piece of wood and the extra wiring needed for the fan.

The final outcome looks like this.  Pretty cool seeing how their program works, its very efficient and i love how it did add up things as we went along so you left knowing exactly what you spent - no waiting around for a week while the quote was completed.

Now here's the thing that jacked me off about HSI. I asked if we had a choice in powerpoints. They said no the ones that are standard are the clipsal Eclipse - Something like this.

Anything else was an "upgrade". so we left it at these ones as who wants to spend extra on powerpoints! Defiantley not top of my list as upgrades you need to do to a house unless you have pockets of cash.

 Following the appointment dad suggested we just get the stock standard powerpoints so that wehn he does alot of the after handover points they will be cheaper to buy, a quick call to Middys and they confirmed the 2000series was $4.62 and the Eclipse was $7.92.


I then rung HSI to ask if we could just have the stock standard ones, they are cheaper, you would think they would cost them less. But no they wanted us to pay $80 for the "upgrade" pfft! im not paying $80 for these when they are worth nearly 50% less than the ones we are getting. 

They raved on about buying power and all that jazz, and i get that! no one wants cheapy power-points if they can get nice ones. But really who cares! they aren't something i work into someone else's house and say "woah that's an ugly power-point"  Anyways...........i told HSI that i didn't want to pay for the upgrade can they help me out and waive the $80 fee - response "no its $80", i asked again - pleaded my case, and still no budging. My blood pressure was going up, stress levels were high. A company of this size making a set income monthly due to being linked up  with HOG can not even go that extra mile to help out a customer  They have the attitude that its a given business, they don't need to try and impress us, what can we do about it! Nothing! I was so mad! It was $80 friggin dollars! So if they weren't going to help us out i wasn't giving them anymore business that i had too. 

So i removed the antenna, ill get our antenna guy to install it. Someone who was willing to help us out with our current antenna, and someone i know will go the extra mile to HELP a customer. Someone that you want to recommend to friends! not a company that sits on top of a perch all high and mighty thinking they don't have to please a customer. He quoted us $550 which was cheaper than HSI $635 anyway!

We also took out a few more power points and dad will be able to put them in for us! And what ever he cant do ill HAPPILY pay an electrician to do it over HSI anyday! 

$80!!! seriously HSI! not like im ever going to recommend you to anyone!!  its a competitive industry out there. Its a shame that HSI don't want to please a customer. I get more discounts buying a washing machine in harvey norman then i do form these guys or ANYONE at HOG - maybe that's another post i can write about, without going off on a tangent! the lack of discounts you get through the whole process is A JOKE!

They are worse than the Big 4 Banks trying to get as much cash as possible from us and charging us for upgrades that are 3 times more expensive than RRP. So disappointing!

Thursday, 3 October 2013

Bathroom Selections (Cook's Plumbing and DiLorenzo)

Bathroom was covered by "Cook's" Plumbing for all our tapware and basins and the DiLorenzo for the tiles. 


Cook's Plumbing Services
We first saw cook's at our HOG appointment. Peta was lovely. So helpful and nothing was ever a bother. I lost count of how many times i asked her to quote on something for me, whether it be the kitchen sink mixer, an oven or the ensuite tapware it was never an issue.

There was never any threat to "Hurry Up" and finalise the variation. and never a mention that the constant changes and asking for quotes would cost admin fees (not like KC but more on that one later)

After many quotes and emails i had finally reached a decision. It was fairly easy in the end. I just stuck to my budget for the tapware and didn't really choose anything that was overly expensive, so i could make my little changes for minimal costs. It was nice to have upgrades only cost $20 and $7 rather than the $$$$$ that KC and HSI charge for the smallest of upgrades.

Here are the final selections:-

Main Bathroom

part of the luxury upgrade package was the Irwell YUKON tapware range. This range was through out the house but we kept it for the main bathroom only.


We then changed the basins from the large above counter square ones for something as small as posisble. Our vanity was only going to be 750mm, which is tiny, so i wanted the smallest basin i could get, and it was this one, the "Cara Diablo" which measures 41cm across. Because its square i didn't mind matching it with the Yukon tapware range.


Featured in the HOG showroom


We also added another single towel rail to the range. The rails that were included in our package were the DORF ENIX range - these were included in both ensuite and the main bathroom.


The vanity (Designed through KC) will be standard, 2 cupboards. The draws were about $300 to upgrade so we didn't bother. We did upgrade to the Essastone benchtop and the colour chosen is "New Crystal Salt". The vanity doors will be in Mushroom Linea

Ensuite

Our standard house plans included a double basin vanity in the ensuite. We have decided to remove one of the basins so we can have a long bench with plenty of space. We removed the included above counter square basin for a round basin, and something not quite as large. We chose the Caroma Orbis Inset Basin.


Featured in the HOG showroom

I also wanted some different tapware in the ensuite, and something round to suit the shape of the basin. I decided on the Novelli Dynasty basin mixer and shower mixer. The total upgrade was around $30


The vanity was once again done through KC. We did upgrade to stone aswell, and chose "Crstal Chalk" for this. the Laminex colour is Noccturine Oak. 


The hardest thing i found with cooks was when i wanted to change the basin to a single one in the ensuite you then have to check with KC to make sure it wont effect costs to the vanity, and also speak to EBH about the refund on the basin. So you end up sending 3 times as many emails to try and get the right answer from teh right person. A little frustrating at times as the most simple of questions could take a few days to confirm.

No complaints what so ever dealing with Peta. The selctions on the day did take longer than expected there are a lot of taps on display and then you can pretty choose from any tapware range in any catalogue from numerous brands, so the choices are endless. Emails were answered promptly and changes were never a problem, by far the best asset that HOG have going for them and the other companies could learn alot from cook's and how they operate.

DiLorenzo Tiles

The tile selections took a couple of hours. I thought that we would get a little bit more guidence from our consultant about what colours go with what. I found the whole tile experience really frustrating. Most of the tiles are stuck to the wall and if you choose a tile from one end of the showroom to go with a tile up the other end you cant see them together unless they happen to have a spare one floating around. On some tiles they did and others they didn't. How can someone be expected to choose the tiles for their house if they cant see the full story together to make sure the colours ompliment each other. And without much guidence from our consultant we had no idea if the colours we were choosing were correct.

DiLorenzo seem to pride themselves on the porcelain tiles. 3/4 of the showroom is expensive porcelain. Im talking $110+sqm plus the extra laying costs. a porcelain upgrade to tile our house would of cost in excess of $9000. The ceramic tile range is small. They class the 40x40cm tiles as standard floor tiles and the 20x20cm floor tiles for the bathroom as standard. Everything else is an upgrade and you pay for it too! lucky the bathroom and the ensuite are small enough that choosing an upgrade tile in the end was only about $200-$400 for each of the rooms.

I ended up visitng DiL atleast 6-7 times to double check my selections, and in the beginning i struggled to even find any tiles that i really liked. But as our colour selections came together i found some tiles that i liked and now im really happy with our selections and cant wait to see them in the bathrooms.

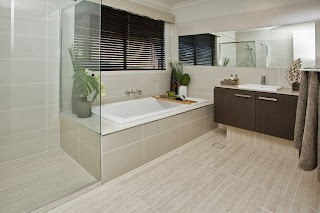
I had some ideas that i wanted to follow from photos id found off the internet on how i would like my tiling to look


We will have the mirror that extends over the bath too. and the tiles to be at vanity height the whole way around for a streamlined look

I loved the colours of this bathroom

Main Bathroom

First we chose a large 40x40cm floor tile and a 20x60cm wall tile but then after thinking about it for a week we thought that our main bathroom might be too small for such a large tile. so we went back the following weekend and re-selected our tiles and chose a 30x30cm floor tile and a 20x40cm satin finish wall tile

First choice....

Floor Tile 40x40cm - White Internal
Wall Tile 20x60cm - Grey ORGGY26
Feature Strip 15cm - Ash FLO043
Essastone - Crystal Salt
Vanity - Mushroom Linea

Final Choice....


Floor Tile 30x30cm - "Canapy"
Wall Tile 20x40cm Satin Finish "Bone"
Feature - Ash 


I love the look of the satin wall tile over the gloss. It looks so natural and earthy. Its something totally new and not really seen before - well ive never seen a wall tile that isn't a gloss. But this matches the sheen of the floor tile. and i CAN NOT wait to see this in the bathroom.  I was going to change to the darker vanity colour like the ensuite but decided to leave it as the mushroom linea. I was able to view the mushroom linea in the laminex showroom in prospect and its a nice colour. Not to light and not to dark i hope it will compliment the tiles nicely.


My bathroom colours with paint colours and carpet (even though carpet wont be close to this room)

Bathroom colours against the flooring

Ensuite
We selected our ensuite range from the upgrade tower at HOG. Standard tiles but they were larger in size so we had to pay the extra fee for the underlay - maybe just an excuse to get more $$$ :P

Not to sure on the names of this range but floor tile 30x30cm and the wall tile is a whooping 30x60cm. We will have the plain "walnut" glass feature strip similar to the main bathroom. These photos dont show the colours properly, but the floor tile is brown tones where as the photo makes it look grey.


Toilet - Will be the same as the bathroom floor tiles

Laundry - we chose a 40x40cm tile from the standard range for the floor called Smooth and the splashback tile was just a standard tile called smoke. We will be getting a laundry fitout done after handover so wasn't to concerned abotu the splashback tile.


Kitchen Splashback - We chose a 20x60cm tile called "Trio Flax" its a grey tone to it and should compliment the sarsen grey laminex colours nicely. Gone for fairly neutral tones and hopefully in years to come wont be regreeting that i have gone with a grey over something like an off white colour. The bench top is very neutral so i think the splashback will add some constrast and give it a lift.


This photo shows the kitchen tile (top) and the main bathroom tile. Its slightly darker but not that much.

Showing the splashback tile, kitchen cupboard Sarsen Grey and the 2 bench options i had which was "New Crystal Salt" and "Crystal Chalk" We have stuck with the crystal chalk i think it suits the other options better as its a similar tone and  a bit warmer in colour than the crystal salt.

Ignore the striped tiles on the left, but the one next to it is another shot of the splashback with kitchen cupboard colour next to it.